37. Plunger
The plunger is certainly one of the defining features of pinball.
It's as iconic as the flippers and steel balls. It's also one of the
trickier parts of building a virtual cab. Plungers obviously aren't
standard input devices for PCs, like keyboards and mice. There really
isn't anything in the standard set of PC input devices that's at all
equivalent. If you want a plunger for your cab, you need specialized
hardware, purpose-built for the job.
Happily for us cab builders, such specialized hardware
exists. There are a couple of commercial options available, and
the Pinscape software offers multiple sensor options
that you can build yourself.
In this chapter, we'll look at the plunger hardware options available,
and some of the issues involved in planning and installing them. The
good news is that there are lots of good options if you want a
plunger, but all of them require some planning work.
Plunger or Launch button?
The first decision you should make about plungers is whether you want
one at all. Most real pinball machines have plungers, but a plunger
isn't an absolute necessity for a virtual cab. A simple Launch Ball
button is adequate - although a compromise, because it doesn't give
you the same degree of control as a physical plunger.
There are really three configurations to choose from:
- Plunger and launch button. The most popular option among pin cab builders. Lets you choose the best type of control for each game.
- Launch button only. Simpler and cheaper, but sacrifices the control of a real plunger for skill shots.
- Plunger only. This is an option if you're using Pinscape or a Zeb's Boards plunger, because these devices can do double duty as virtual Launch buttons when needed.
Option 1: Plunger and Launch button
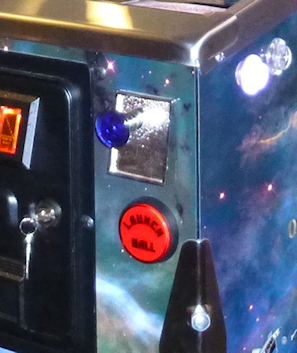 I haven't done a scientific survey of cab builders, but I think the
most common answer to "plunger or launch button?" is "both". With
the plunger in the standard position, there's room directly below
it for a Launch button, at least in a full-sized cab.
I haven't done a scientific survey of cab builders, but I think the
most common answer to "plunger or launch button?" is "both". With
the plunger in the standard position, there's room directly below
it for a Launch button, at least in a full-sized cab.
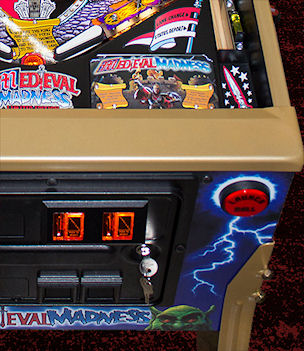
Some cab builders flip this arrangement upside down, with the Launch
Button in the normal plunger location and the plunger located below
it. I don't personally like the appearance of that; it always looks
to me like the plunger got installed in the wrong spot. If part of
your motivation for installing a plunger is a more realistic look,
this works against that purpose. Aesthetics aside, though, there are
some pragmatic advantages to the inverted arrangement. One is that
it's arguably more ergonomic: the plunger-on-top arrangement makes the
Launch Ball button a little inconvenient to reach, since the plunger
sticks out enough to be in the way. The other is that it gets the
plunger out of the plane of the TV, which makes it possible to
position the TV all the way forward against the front wall of the cab.
If you were going to move the plunger down from its normal spot anyway
to accommodate a TV, this arrangement can at least get some extra
mileage out of that.
Option 2: Launch button only
 Some pin cab
builders choose to forego a plunger entirely and just use a Launch
Ball button. This is a perfectly viable option functionally, because
all of the PC pinball programs let you operate the on-screen plunger
via the keyboard. And it doesn't make your machine look unrealistic,
since a number of popular real arcade pinball machines also used
button launchers.
Some pin cab
builders choose to forego a plunger entirely and just use a Launch
Ball button. This is a perfectly viable option functionally, because
all of the PC pinball programs let you operate the on-screen plunger
via the keyboard. And it doesn't make your machine look unrealistic,
since a number of popular real arcade pinball machines also used
button launchers.
If you're accustomed to playing pinball on your desktop PC, you
already know how button-based plunging works. The convention on most
desktop pinball games is that you press and hold the Enter key to
start pulling back the plunger. As long as you hold down the Enter
key, the plunger keeps retracting at steady pace. As soon as you
release the Enter key, the game fires the plunger from however far
back it was at the the moment of release. You control the strength of
the launch by timing the release. To make this work with a pin cab,
you just wire the Launch Ball button to act like the Enter key.
This time-based plunger action is a compromise for playability,
obviously. It doesn't give you the same control you'd have with a
physical plunger, and it's not a very good translation of the
mechanics of a real plunger. But it at least serves the function,
letting you make do with just a button if that's your preference.
Option 3: Plunger only
If you use a Pinscape Controller plunger or one of the plunger kits
from Zeb's Boards, it can
serve double duty as a Launch Ball button for tables that don't have
conventional plungers, such as Medieval Madness or
Terminator 2: Judgment Day. This makes it possible to
play every type of game using just the plunger, so that you don't
have to install a separate Launch button.
If you're using another plunger device, you should stick with the
"plunger and Launch button" option. The ability to simulate the
launch button is a feature of the plunger device, and other devices
besides Pinscape and Zeb's don't generally have this ability.
If you're building a Pinscape Controller plunger, see
ZB Launch Ball for details on how to set this up. If you're
using a Zeb's Boards unit, consult the owner's manual for the device.
Which option is best for you?
The only reasons I'd consider not including a plunger in your
cab is if you're on a very tight budget, or you want to keep the
project very simple. A plunger has such strong advantages that I'd
only decide against one because of some external constraint like that.
In terms of functionality and aesthetics, I think there's no contest.
If you do decide on a plunger, I personally think it's best to include
a Launch button as well, so that you can use the control type that
exact fits each game. But if your plunger can simulate a Launch
button (as Pinscape and Zeb's Boards plungers can), this is only a
slight edge functionally. You can choose according to whether you
think more buttons will make your cab look cooler or make it look
cheesier.
Why do I give the plunger such high priority? There are two main
reasons. The first is aesthetics: a plunger makes your pin cab
look more like a real pinball machine. The plunger is practically a
defining feature of pinball, so its presence will instantly convey to
anyone looking at your cab that it's a pinball machine. Yes, there
are some real arcade pinballs that use launch buttons or gun triggers
or something else in place of a plunger, but to some extent they do
that to stand out from the crowd. With pin cabs the challenge is
to make them stand out less from the real machines than they
already do by virtue of their virtual-ness.
The second reason is that plungers are actually useful for game play.
If you're not an experienced pinball player, plungers might seem
pretty binary: you pull it back and let it go. But if you've played
more seriously, you know about the venerable tradition of the skill
shot, an element of many tables where you can score a bonus by
launching the ball with just the right speed or timing. That requires
precise control. A good virtual plunger can give you that control; a
button just can't. The extra control adds to the fun for games with
skill shots.
To summarize, here are the advantages of each option:
| Plunger | Launch Button |
|---|---|
| Realistic | Simple |
| Skill shots | Cheap |
| Classic look | Modern look |
Choosing a plunger device
This can be a tough decision. There are several options available,
with different tradeoffs. Let's look at what's available and the
relative advantages of each option. We'll start with a quick
comparison chart for easy reference, then go into the details on each
of the options.
The prices shown are only estimates, and of course they're likely to
change over time, as prices tend to do! For the DIY options, the
estimates are even more approximate, since there are different ways
you can build the projects. For example, many of the DIY plans
include custom 3D-printed parts. If you have your own 3D printer at
home, you can fabricate those for the cost of the filament, which
might only be a few dollars; but the same parts might cost $10 or $15
if you have to order them from a commercial 3D print service. And for
that matter, you can sometimes make do without the 3D-printed parts,
by substituting something improvised. To be conservative, though, my
estimates assume that you're using the recommended 3D-printed parts
and ordering them through a commercial print service.
Also note that the Pinscape options all require a KL25Z
microcontroller board to run the Pinscape software. I didn't include
the price of the KL25Z in the price estimates, since I'm assuming that
you're already pricing that into your system for its other features.
A single KL25Z can handle the plunger along with all of the other
Pinscape functions, so you just need the one. If you weren't
already planning to include a KL25Z in your system anyway, you should
add $15 for the KL25Z to the price estimates for the Pinscape plunger
options.
| Device | Type | Price (est.) | Degree of difficulty | Accuracy | Features |
|---|---|---|---|---|---|
| VirtuaPin plunger kit | Commercial | $160 | Easiest | Not tested | 15 buttons, accelerometer |
| Zeb's Boards plunger kit | Commercial | $150 | Easiest | Not tested, est. Very Good (<1mm) | 19 buttons, accelerometer |
| Pinscape potentiometer | Open source | $20 | Medium Low | Very Good (<1mm) | All Pinscape features |
| Pinscape with Oak Micros potentiometer | Open source | $25 | Low | Very Good (<1mm) | All Pinscape features |
| Pinscape TCD1103 | Open source | $50 | High | Excellent (0.1mm) | All Pinscape features |
| Pinscape AEDR-8300 | Open source | $30 | High | Excellent (0.1mm) | All Pinscape features |
| Pinscape VCNL4010 | Open source | $10 | Low | Good (1mm) | All Pinscape features |
| Pinscape VL6180X | Open source | $20 | Medium | Low (1cm) | All Pinscape features |
| Pinscape TSL1410R | Open source | N/A | Medium High | Very good (0.25mm) | All Pinscape features |
("Not tested" means that I don't have any hands-on experience with
that device, so I can't say how well it works compared to the options
that I've tried in person.)
Top picks: I've tried to provide all of the details to let
you make a fully informed decision yourself, but if you want my summary
opinion, here are my top picks according to what you consider the
most important priority:
- If you want it super easy: the Zeb's Boards kit
- If you want it super cheap: Pinscape with potentiometer or VCNL4010
- If you want the Pinscape features, with fairly easy setup: Pinscape potentiometer, VCNL4010
- If you want the best performance, and you're up for a more challenging build: Pinscape AEDR-8300 or TCD1103
Now let's look at the available options in depth.
Commercial options: The two available commercial options that
I'm aware of are from VirtuaPin
and Zeb's Boards. You might also
see an old product called the Nanotech Mot-Ion Adapter mentioned in the
forums, but that was discontinued years ago and is no longer available
for purchase.
- VirtuaPin's product uses an IR proximity sensor to detect the plunger position. That's a nice design in principle because it's physically simple and reliable, but when I tested their version 2 product years ago, I found that it was too low-res for my needs. Their version 3 product (current as of 2021) uses a different sensor that has better native performance, but I haven't tested their implementation. The v2 sensor resolution was the only problem I had with this product, though; otherwise it's a solid offering, well packaged and easy to set up. It includes a button encoder that lets you connect about 15 cabinet buttons, and an accelerometer for analog nudge input. It's not expandable, though, and 15 buttons is a bit limiting for a decked-out pin cab.
- The Zeb's Boards plungers use slide potentiometers as sensors. I haven't tested any of Zeb's plunger products myself, but I consider the basic physical sensor type sound because the same sensor type works well with the Pinscape software. The Zeb's Boards products include button input connections and accelerometer nudging features similar to the VirtuaPin product. Zeb's has an excellent reputation for technical support.
The big advantage of the commercial products, and it really is a big
advantage, is ease of setup. They both come as complete packages,
with all necessary parts included, and installation is simple for
both. They also come with official technical support from the vendors
(with a personal touch, too, since both are small businesses; you
won't have to talk to an outsourced tech support call center).
The downside of the pre-packaged products is that they're closed
systems with somewhat limited feature sets. Not overly limited - they
both have good coverage of the basic pin cab necessities. But the
cost of keeping things simple is that they don't offer much
configurability or flexibility to expand beyond their fixed features.
And of course the software is proprietary, so there's no way to
add features or fix bugs yourself; you have to rely on the vendors
for bug fixes and feature upgrades.
Pinscape options: Pinscape is a semi-DIY option. "Semi" in
that you have to buy all the parts and do all of the physical setup
work yourself, but you don't have to figure everything out from
scratch, and you don't have to write any of the software. This build
guide has plans that you can follow for a number of plunger sensor
options, including parts lists and assembly instructions, so while
it's not as easy as ordering a finished product and plugging it in,
it's also not a research project. And of course all of the software
is already written. If a research project is what you're looking for,
though, this can be a good starting point. It's all open-source, so
you're free to modify the sensor designs and software if there are
things about them you want to improve.
All of the Pinscape options naturally require the Pinscape software
running on a KL25Z, so you should factor the cost of the KL25Z (about
$15) into the overall price if you weren't already planning on a
Pinscape device anyway. (If you were, you won't need a separate
KL25Z for the plunger - a single KL25Z can handle all of the Pinscape
functions simultaneously.)
The Pinscape software has built-in support for the following sensor
types:
- Potentiometer: A potentiometer is a variable resistor, in this case
one with a sliding lever that smoothly varies the electrical
resistance level as you move it from one end to the other. They make
these primarily for audio mixing panels and similar control panels,
but they also work well for plunger position sensing, since the
plunger slides back and forth in a straight line. The plunger travel
range is about 80mm long, so we need a sliding potentiometer with a
slightly longer travel than this. Suitable pots around 100mm long
are easy to find.
The performance of these sensors is pretty good. In my testing, you get accuracy of about 1mm, which is good enough for smooth on-screen animation and tracking. The only negative is that the analog nature of the device means that there can be some random noise in the signal, which shows up on-screen as "jitter". It's pretty minor, and the Pinscape software has a filtering option to reduce it, with some trade-off in accuracy.
Pots are the least expensive type of plunger sensor, since the only required part (other than KL25Z) is the potentiometer, which runs about $6 at Mouser. If you want to keep it really cheap, you can improvise your own mounting apparatus out of plywood and generic fasteners (L-brackets or that sort of thing). If you want to make it a little tidier (at slightly higher cost), the plans in this guide include a 3D-printable mounting bracket that you can fabricate.
- Oak Micros's potentiometer (no longer available): This works the same as the DIY potentiometer above, but it comes with an easy-to-install mounting bracket and saves you the work of sourcing the parts and assembling and wiring everything. I don't think this is available any longer, because Oak Micros announced in June 2021 that they're no longer shipping any of their products. You can check the original announcement on vpforums to see if there are any updates:
- VCNL4010: An IR proximity sensor that can measure the distance to a nearby object, such as the end of the plunger. For a Pinscape setup, you mount the sensor near the end of the plunger, so that it can measure the distance between itself and the plunger; that serves as a measurement of the plunger's current position. This sensor is cheap (about $7.50) and easy to set up (maybe even easier than the potentiometer), and it's completely non-contact (no wear and tear from moving parts). Its performance isn't quite as good as some of the other options (the potentiometer, AEDR-8300, and TCD1103 are all more precise), but it's still pretty good. Given its low price and easy installation, it's worth considering.
- TCD1103: This is an optical imaging sensor that detects the plunger
position by rapidly taking pictures of the plunger. The TCD1103 chip
is a high-resolution CCD (a type of camera sensor) that produces great
quality images, which makes for excellent performance in the position
sensing. It's capable of reading the plunger position to better than
1/300", with great stability, which makes for a very smooth on-screen
response. The downsides of this sensor are that it's complex
to build, and fairly expensive. It requires some additional electronics to interface to the
KL25Z, as well as a small lens to focus the plunger image onto the
sensor. I've designed a printed circuit board and 3D-printable
mounting bracket (both open-source, of course) to bring it all
together, so it's fairly straightforward to assemble one of these
systems using my plans. However, there are enough parts involved that
it does take a little online shopping work to source everything -
plus, the printed circuit board uses SMD (surface-mount) components,
which can make the soldering job intimidating if you haven't worked
with these before. But I really like this sensor for its excellent
performance and the fact that it has no mechanical contact with the
plunger (so there are no moving parts to wear out). See
Plunger Setup (TCD1103).
This is a fairly expensive option. The sensor chip all by itself costs about $15 at Mouser, and you'll also need a lens (around $8), lens holder (about $1), circuit board ($6-$15), a 3D-printable mounting bracket (around $10 if you have to order it from a commercial 3D print service), and a few other electronic parts ($5), for a total around $50.
- AEDR-8300: This is a specialized IC chip known as
a "quadrature encoder", which uses optics to detect motion across a
pattern of uniformly spaced, alternating black and white bars. The sensor tracks
motion by counting the bars it passes. The bars are closely
spaced, 75 line pairs per inch, and the sensor can determine its
position to half the width of a bar, so the position reading is accurate to 1/300".
This is an excellent sensor in terms of accuracy and
stability; when set up properly, it really does achieve that 1/300"
accuracy, which makes for silky smooth animation and tracking in the
on-screen plunger. The big downside is that it's rather complex to
set up, both because it requires a bunch of specialized (but easily
fabricated) parts, and because the AEDR-8300 chip itself is a tiny
SMD (surface-mount) chip that can be intimidating to work with
if you haven't done SMD soldering work before.
See Plunger Setup (AEDR-8300 Encoder).
This option requires a custom circuit board ($5), the electronics for it ($10), a laser-cut acrylic piece (about $1, although it's only practical to order in quantities of about a dozen), and a 3D-printable bracket ($15), which adds up to about $30 in parts.
- VL6180X: This is a "time-of-flight" IR distance sensor, which means
that it measures the distance between the sensor and a nearby object
by measuring the amount of time it takes for a pulse of light to
reflect off of the object and return to the detector. For use with a
plunger, you position the sensor at the end of a tube that you place
around the plunger, with the sensor pointing at the plunger tip to
measure the distance to the tip. The software works out the plunger
position using the distance reading, knowing that the sensor is always
at the same fixed position. These are relatively cheap and very easy
to set up, since you can buy pre-built boards featuring these sensors
from several hobby-electronics companies. Unfortunately, I don't
consider these accurate enough to be usable - close, but not close
enough. They nominally take distance readings in 1mm increments, but
they're really only accurate to about 1cm. That makes the on-screen
plunger animation very "chunky" when you connect them to a pinball
program. They need about 10x better accuracy to be really workable;
maybe the next generation in a few years will achieve that. I don't
recommend these, but given how easy they are to set up, some people
might find them "good enough." See Plunger Setup (VL6180X Distance Sensor) if you want
to read more about these.
You can buy pre-built boards with this sensor for about $15 from Sparkfun, Adafruit, and some other hobby robotics companies. You'll also need to improvise some kind of mounting bracket, which might add a little cost if you come up with something requiring 3D printing.
- TSL1410R/1412S: This is the late, great, original Pinscape sensor, but sadly, the manufacturer stopped making it and the supply dried up a long time ago. This sensor was a linear photosensor array, consisting of a single row of 1280 pixels (1410R) or 1536 pixels (1412S). The row of pixels was by a magical coincidence roughly the same length as the overall plunger travel distance of about 80mm, so the idea was that you placed the sensor near and parallel to the plunger rod, and placed a light source on the other side; the software read the position by taking a snapshot of the pixels and scanning the image for the shadow cast by the plunger. This worked pretty darn well and was only middlingly difficult to set up, although the sensors themselves were fairly pricey (about $40). But alas, it's more or less impossible to build this design now since it's more or less impossible to find the sensors. But for the sake of historical reference, you can still read about it here: Plunger Setup (TSL1410R Optical Sensor).
The sensors listed above are the ones that are already supported in
the software. But they're not the absolute last word in sensors by
any means. It's perfectly possible to add new sensor types, if you
come up with something not already supported. The software internally
uses an abstract C++ class for the basic plunger interface; each
actual sensor's code is written as a subclass of this abstract base
class. Adding a new sensor is a matter of adding a new subclass. You
can do that yourself through the miracle of open-source software, or
you might well be able to persuade me to write the code if you come up
with something that improves on the sensors already supported.
Fully DIY options: It's certainly possible to come up with a
whole new design of your own, without any commercial products involved
and without basing anything on the Pinscape software or hardware
plans. I don't think full DIY is the best option for most people,
given that the Pinscape software is open-source, meaning that can use
it as a starting point no matter how radically you want to change or
customize it. That should save you a ton of time compared to starting
completely from scratch. On the other hand, if you're as fond of
tinkering with these things as I am, the challenge of building a whole
new system from scratch might be way more appealing than just adapting
an existing piece of software.
It would obviously defeat the purpose of "fully DIY" to give you a
list of particular DIY options here. But purely to spark your
imagination, I'll mention some approaches I've heard about, without
going into too much detail:
- Use a computer mouse that's either attached to the plunger rod, or positioned so that it can scan something attached to the plunger rod. See "My Mouse Plunger Setup (aka... Cheap :)": www.vpforums.org/index.php?showtopic=38064.
- Some early pin cab builders created a sort of hybrid of the plunger and launch button by using a microswitch at the end of the plunger travel as the sensor. The switch was connected to a button encoder as the Enter key, so that pulling back the plunger by any amount acted like pressing Enter, and releasing it would hit the switch again and release the Enter key. You launched the ball using the desktop convention of a timed plunger pull based on how long you held down the Enter key. This isn't a position sensor by any means, but it's simple and at least creates the appearance of a plunger.
- One person on the forums several years ago used an LVDT (liner variable differential transformer), a type of position sensor that uses inductive coils to sense the position of a metal rod. Sounds perfect for a plunger sensor, doesn't it? The snag is LVDTs are super expensive (hundreds or even thousands of dollars) and hard to come by. LVDTs were apparently popular in industrial applications ten or twenty years ago, but they seem to have been largely replaced by optical and magnetic quadrature sensors in more recent times. The ones still on the market are ridiculously expensive specialty products that are way out of range for a pin cab project. It also looks like the electronics to interface one to a microcontroller are pretty complex.
Positioning the plunger
Before you start drilling holes for your plunger, you should carefully
consider all of the other things that have to fit into the
same area, to be sure you don't have any conflicts when you start
installing things.
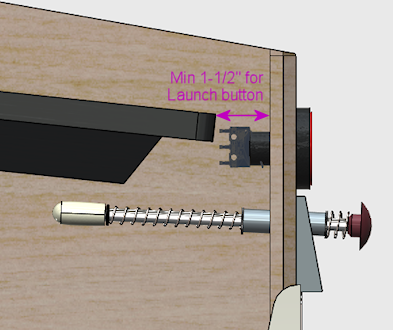
A standard plunger sticks into the cabinet by about 5¾" from
the inside of the front wall. It occupies the area out to a minimum
of about 1⅝" from the inside right wall for the plunger rod
itself, but your plunger sensor might require extra clearance on top
of that. For example, the Pinscape AEDR-8300 sensor requires a
plastic part to be attached to the plunger rod, which increases the
clearance area to about 1¾" from the inside right wall.
Clearances required around the plunger.
Things to take into account when determining the plunger position:
- The TV. On a real pinball machine, the plunger is in roughly the
same plane vertically as the playfield. They make this fit on a real
machine by cutting a plunger-sized notch out of the playfield at that
corner. That's not helpful for virtual cabs because you can't cut a
notch out of the TV. If you're positioning the TV in the same plane
as the plunger, you'll have to leave a gap between the front of the
cabinet and the front of the TV to make room for the plunger. If you
don't want to leave a gap, you'll have to move the plunger down
far enough to get it out of the way of the TV.
See also "The dreaded plunger space conflict" in Playfield TV Mounting.
- The right wall of the cabinet. This constrains how far to the right the plunger can go. The standard plunger position, shown in the drilling template below, is positioned about as far to the right as it can possibly go, due to the bolts on the housing. Don't try to move it further right.
- The flipper buttons. The plunger is usually in the same plane as the flipper buttons. If you're using standard leaf switches like on a real machine, there should automatically be enough room , since the "right wall" constraint above leaves enough room (just barely) for the buttons and switches on a real machine.
- The coin door. This limits how far left you can move the plunger. On a standard-width cabinet, there's about 1" of clearance between the plunger housing and the coin door. (You'll have more clearance if you're building a widebody cabinet or a custom size that's wider than standard.) This isn't usually a significant constraint since you usually want the plunger positioned as far right as it can go.
- The right front leg. If you're using real pinball parts for the legs, this constrains how far down you can move the plunger from the standard position. You can move down by at most about 3" from the standard position.
Plunger on top vs. Launch button on top: Most cab builders who
include both a plunger and a Launch button put the plunger on top.
But some people invert the stacking, placing the Launch button in
the normal plunger spot and moving the plunger down a few inches.
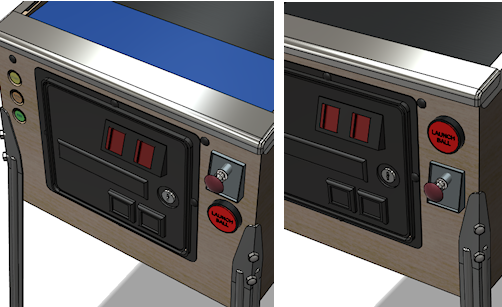
Above left: Exterior appearance with the standard plunger placement,
with plunger on top and Launch button below. Above right: Inverted
arrangement with the plunger on the bottom.
The main reason to put the plunger on the bottom is to make room for
the TV to come all the way to the front of the cabinet. With the
plunger on top, you'll probably have to push the TV back a few inches
to leave enough room for the plunger; some people hate the idea of
that gap between the TV and the front of the cabinet. I personally
find the gap benign, and in fact I even prefer a little set-back, so
that you're not looking straight down at the flippers. The inverted
arrangement also looks weird to my eye, since the plunger is
always at the same spot in the real machines.
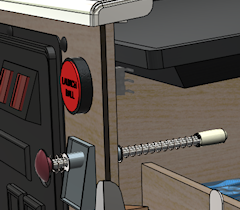
Lowering the plunger to get it out of the way of the TV,
so that the TV can be moved all the way forward to the front
of the cabinet.
If you decide to move the plunger down to make room for the TV, be
sure to measure everything carefully with your actual TV. The shape
of your TV case is important here, since that determines how far down
you'll have to move the plunger to clear the back of the case. Also
pay attention to the slight upward tilt of the plunger rod relative to
the housing. The rod is angled upward at about 3°, which makes
the front of the rod slightly higher than the holes drilled in the
front wall (see the diagram below). The open area needs to be about
¼" higher than the top of the drilled holes in the front wall.
If you're including a Launch Ball button in the position where the
plunger normally goes, make sure you leave room for its intrusion on
the inside of the cabinet when positioning the TV. It requires about
about 1½" clearance from the inside front wall. This usually
isn't a problem, because you'll probably want to position the TV at
least 2" from the inside front wall anyway, since a standard lockdown
bar covers up about that much space.
Drilling the holes
See "Plunger and Launch button" in Cabinet Body for a
drilling template for the plunger opening, and measurements for
the standard placement of the plunger and Launch button.
Remember to make any adjustments to those plans if you're
repositioning the plunger vertically.
Standard ball shooter hardware
If you buy a commercial plunger kit, the plunger assembly is usually
included in the price. If you're building one yourself, here are the
parts you need.
You can buy fully assembled ball shooters from any pinball parts
supplier, such as Pinball Life or Marco Specialties (see
Resources). Nearly all machines made since about 1980 use
the same assembly, which you can find listed at the pinball parts
vendors under these Williams/Bally part numbers: B-12445-1, B-12445-6,
B-12445-7.
Alternatively, you can buy the individual parts separately, if you
wish to customize anything. Pinball Life lets you choose colors for
the knob and rubber tip, but you'll have to buy à la
carte if you want a custom knob. You can also buy a "knobless"
shooter rod, which lets you create your own custom knob for a unique
look.
Springs are available in different tensions. I'd recommend a lower
tension spring for virtual pinball use, because you're never going to
hit an actual ball. The energy has to go somewhere when there's no
ball to hit, so it usually goes into rattling the cabinet. Lower
spring tension reduces the speed and cuts down a bit on the rattling.
Here are the individual parts, with Williams/Bally part number references:
- Shooter rod: 20-9253
- Shooter housing: 21-6645-1
- Shooter housing sleeve: 03-7357
- Barrel spring (¾" long x ⅝" diam): 10-149
- Inner spring (5½" long x ½" diam): 10-148-1
- E-clip (⅜" shaft, 5/16" groove): 20-8712-37
- Washers (25/64" x ⅝", 16 gauage, qty 2): 4700-00051-00
- Rubber Tip: 545-5276-00
There's also a special mounting plate that goes with the ball
assembly, which for some reason is never included in any of the
complete assemblies or pin cab kits. It's not an absolute
requirement, but it makes the installation easier and cleaner. You'll
also need some specific machine screws, which also aren't included in
the assemblies or kits; they're common parts you can easily find
at a hardware store.
- Ball shooter mounting plate: Williams/Bally 01-3535
- #10-32 x ⅝" machine screws (quantity 3; ¾" length will also work)
Custom knobs: Pinball Life sells a "knobless" shooter rod,
which gives you the option to create your own completely custom
knob. Use your 3D printer to create something unique. Fasten
it with epoxy.
Custom knobs are popular "mods" for real machines. You can find lots
of after-market options on the Web by searching for "custom pinball
shooter". These will work just as well for virtual cabs.
How to assemble a standard plunger
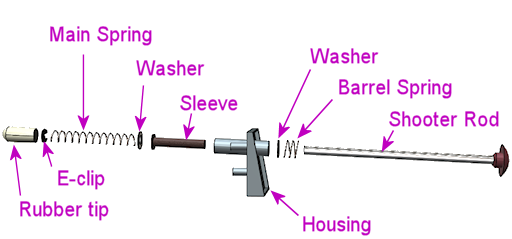
Assemble the parts in the order shown in the diagram above:
- Slip the barrel spring over the shooter rod and push to the knob end
- Slip the washer over the shooter rod and push down to the barrel spring
- Insert the nylon sleeve into the shooter rod opening in the housing (from the inside of the housing)
- Insert the shooter rod into the opening the housing (from the outside of the housing)
- Slip the other washer onto the shooter rod
- Slip the main spring onto the shooter rod
- Attach the E-clip to the rod. You'll have to hold the spring back while you do this, since the spring will be compressed in its normal position. The E-clip fits into the groove near the end of the rod. Use needle-nosed pliers to snap it into position.
- Fit the rubber tip over the end of the rod. (This is optional in a virtual cab; you probably don't need the tip unless you're using some kind of optical sensor that requires it. Leaving it out will save a little space if you have tight clearance to the TV.)
How to install the ball shooter assembly
The plunger is designed to be fully assembled before you install it,
so start by assembling the parts as described above.
Insert the housing into the drilled opening in your front panel, from
the outside. Fit the plunger mounting plate over the screw holes in
the assembly on the inside wall of the cabinet. Fasten with three
#10-32 x ⅝ machine screws. Make the screws fairly tight, since the
plunger is subject to a lot of mechanical force when you use it (but
don't overdo it - you don't want to strip the threads in the housing).
