46. DOF Setup
One of the best tricks you do with a virtual pin cab is feedback
effects: things like flashing lights, shaker motors, fans, solenoids,
replay knockers, and bells and chimes.
To connect output devices to your pin cab PC, you need a special
hardware device called an output controller. That's described in
detail in I/O Controllers. Once you have an output
controller installed, you have to set up some special software called
"DOF", or DirectOutput Framework, that serves as the middle-man
between the output controller and the pinball software (such as Visual
Pinball). This chapter is all about DOF and how to set it up.
If you're not going to include any feedback devices in your pin cab,
you won't need to install DOF at all, so you can skip this section.
What is DOF?
DOF is a separate piece of software that you can install on your
system to control feedback devices. It's not really a full separate
program; it's more of an add-on that works together with Visual
Pinball and other software. DOF handles the communications between
the pinball software and your output controller devices. It performs
two main functions.
First, DOF handles communications with several different kinds of
output controllers: LedWiz, PacLed, SainSmart relay boards, Pinscape,
and more. Before DOF came along, a program that wanted to access
multiple output controllers had to be specially programmed with each
controller's language. DOF provides a common interface that VP can
use to access any of these devices without having to know its details.
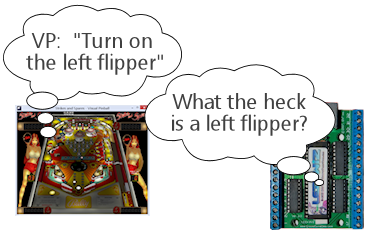
Second, DOF translates between VP's simulated game elements and
the output controller's physical device connections. VP thinks in
terms of the elements in the simulated pinball table: left flipper,
middle bumper, right slingshot, etc. The output controllers, on the
other hand, don't know anything about pinball. They only know about
generic devices attached to their numbered "output ports": port 1,
port 2, port 3, etc. Each output port on an output controller is
basically a wired connection to a physical device such as a solenoid
or flasher light. But the output controller devices don't know anything
about what's attached; they just know there's something wired
to each port.
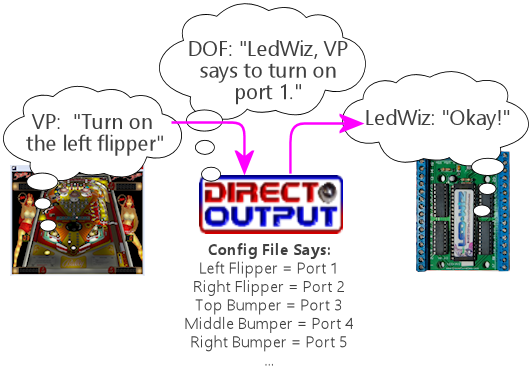
DOF acts as an interpreter to translate between VP's game-oriented
model and the output controller's physical device list. DOF
accomplishes this using a configuration file that you provide,
which tells it the "meaning" of each physical output port.
How VP and DOF communicate
DOF doesn't actually talk directly to VP. It talks to VP through
the B2S Backglass program, which is another VP add-on that handles
the backglass artwork display.
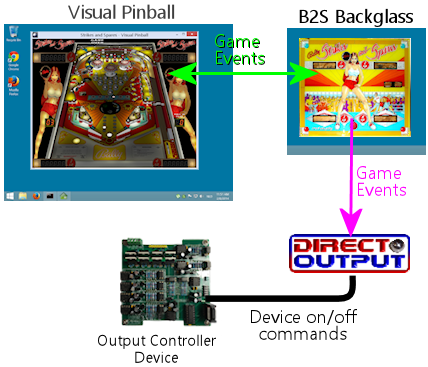
The first step is that VP communicates with the B2S. VP and B2S
exchange information on game events, which are things like "the ball
just hit switch #22" or "lamp #17 just turned on". B2S in turn sends
the game event information to DOF. DOF translates the game events
into feedback device actions, and sends the appropriate ON and OFF
commands to the output controller device.
How this relates to individual tables
Newcomers to DOF often have a question at this point: Is this already
programmed into every VP table?
The answer is a qualified Yes. Almost every VP X table has full DOF
support built in. Most later VP 9 tables also have DOF support,
although many VP 9 tables require you to make a small manual change to
their scripts to activate DOF support. We'll explain how to do this
later.
How to install DOF
Before you install DOF, you must first install Visual Pinball and the
B2S Backglass program. If you haven't already installed those, go
back to Pinball Software Setup and follow the instructions there. If
you're planning to use PinballX as your game selection menu system,
you should also install that first.
Once VP, B2S, and PinballX are installed, you're ready to install DOF.
You have two options for this: automatic or manual.
In either case, you'll have to choose a folder for the DOF files. I
recommend C:\DirectOutput, if that's convenient on your system.
You can use a different name if you wish, but note the following:
- Avoid using spaces in the DOF folder name. A few people have run into problems that were very difficult to isolate, but which seemed to come from using a folder name containing a space character, such as "C:\Direct Output". Even though this shouldn't be a problem, it does seem to cause weird errors on a few machines, so I'd avoid it.
- Try a C: folder if it doesn't work on another drive. Some people have had problems installing DOF on other drives (like D: or E:). As with the space character issue, it should be just fine to use D: or E: or any other drive, but doing so seems to cause problems on some machines. There are sometimes good reasons to use a disk other than C:, so go ahead and try it if you prefer to keep your programs on a different drive. But if you run into any mysterious problems, try moving it to the C: drive to see if that helps.
System requirements
If you're on Windows 7, make sure your system has .Net 4.6
installed before proceeding. That's a core Windows component that DOF
requires. It can be installed via Windows Update. Most newer systems
will already have this installed, but you might have to install it
manually if you're using Windows 7 and recently did a fresh install of
the operating system.
Automatic DOF Setup
The easy and recommended way to install DOF is to use the Windows
Setup-based automated DOF installer. You can find the automated
installer here:
Look for the latest "Windows Setup (MSI)" edition. Download
it and run it. When the installer asks you to pick a folder name,
remember to use a name that doesn't contain any spaces.
If all goes well with the automatic setup, you can skip all of the
"manual setup" steps listed below. The installer takes care of
everything for you. Skip directly to Check
that it's working below.
Troubleshooting:
The automatic setup is usually pretty reliable, but there are a couple
of issues that sometimes come up. If you run into any error messages
that aren't self-explanatory, try these steps:
- Check that UAC is enabled. Some people disable UAC based on advice they find on the Internet. That kind of advice is all badly out-of-date (from the Windows Vista days), but it keeps getting repeated anyway. It's bad advice these days. UAC is an integral part of modern Windows. Disabling it changes some system internals in ways that create headaches.
- Mysterious permission errors might be due to a special
system "owner" of the C:\ root folder, or wherever you're
trying to install DOF. You can check the owner as follows:
- Right-click the folder on the desktop
- Select Properties from the Context menu
- Go to the Security tab
- Click Advanced
- Look for the "Owner" listing
If the owner is SYSTEM or Trusted Installer, the root folder is protected against writing by ordinary user accounts. You can either choose a different parent folder that's not protected like that, or you can run the installer in "Run as Administrator" mode. In the latter case, the new folder will also have a protected system owner when you're done, which will create other problems later. But you can fix that after the install completes, by changing the new folder's owner to match your regular user account:
- Repeat the process above to get to the Owner for C:\DirectOutput
- Click the Change link next to the owner name
- Type your regular user account name in the box
- Click Check Names
- Make sure this expands to a valid Domain\Username and click OK
Manual DOF Setup
I strongly recommend using the automated installer above rather than
attempting a manual installation. DOF is notoriously difficult to
install by hand; it has a million fiddly little details that you have
to get right, and any small oversight breaks the whole thing. And DOF
is bad at explaining what's wrong when something does go
wrong, so it's extremely difficult to troubleshoot bad installs. The
automated installer has proven to be much more reliable.
If you insist on doing it the hard way, though, here's my recommended
manual setup procedure.
Note! To keep things as simple as possible, the instructions
below leave out some details that most people don't need. If you want
the full story, see the DOF documentation, which you can find via the
DOF documentation links later in this
chapter. In addition, the DOF version we link below isn't the only
one available. There are some other modified versions with slightly
different extra features available. See
release status for details.
- Create a DirectOutput folder on your PC called C:\DirectOutput (or a name of your own choosing, but remember that it must not contain any spaces)
- Download the ZIP file edition of my Grander Unified DOF R3+
- Unzip the contents into your new DirectOutput folder
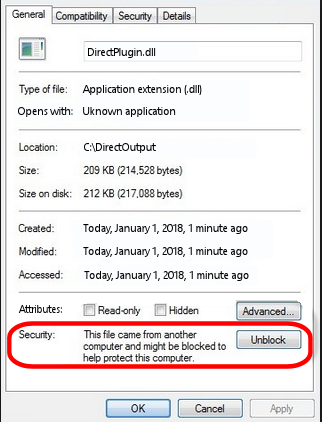
- Unblock all of the new DLL and EXE files. For each file in the new
folder with a .dll or .exe suffix, do the following:
- Right-click the file
- Select Properties from the menu
- Select the "General" tab in the properties window
- Look for a message like this: "Security: This file came from another computer and might be blocked to help protect this computer"
- If you see the message, click the Unblock button next to it
- Open the folder where you installed Visual Pinball. Open the sub-folder
Tables. Look for a sub-folder called Plugins. If
it's already there, great, otherwise create it:
- Right-click in a blank area within the Tables folder window
- Select New > Folder from the menu
- Type Plugins to set the new folder's name
- Open the Plugins folder that you just found or created, then:
- Right-click in a blank area in the folder window
- Click New > Shortcut in the context menu
- Type the full path to your Direct Output folder into the box (e.g., C:\DirectOutput - this is the folder you created above, at the very beginning of this process)
- Click the Next button
- Type DirectOutput for the name
- Click the Finish button
- For the next step, you'll need a Visual Pinball table that includes
a B2S backglass installed. The backglass has to be in a separate
file with the same name as the .vpx table file, but with a .directb2s suffix.
If you don't have any of these table/backglass pairs installed already, you'll
have to install one now. For this test, you can use 2001, because
it's easy to find, being one of the first ones in the list on vpforums.org:
- Open vpforums.org in your Web browser
- Log in (create an account there if you don't have one yet)
- In the navigation bar near the top of the main page, click "Visual Pinball Tables"
- In the box that pops up, look for the "VPX Tables" section, and click "All"
- Click on "2001 (Gottlieb 1971)", which should be near the top of the list (if not, try any of the other tables)
- Click the "Download" link and follow the instructions to download
- Unzip the downloaded file into the Tables folder inside your Visual Pinball program folder
- Make sure that the ZIP file you just downloaded included both a .vpx
file and a matching .directb2s file. If not, you'll have to try
downloading other tables until you find one that includes both, because
the backglass file is required for the next step. Alternatively, you
can look for the matching .directb2s file separately:
- Click Frontend Media & Backglass on the vpforums navigation bar
- Click dB2S Animated Backglasses in the popup box
- Search the list for the matching file
- Click on the file and download it as above
- Make sure the downloaded file has the same filename as the .vpx file for your table, with .vpx replaced by .directb2s. You can simply rename the B2S file manually if its name isn't an exact match.
- Once you have a VP 10 table and matching backglass ready to try, load it into VP 10 and run it. This should display the table and backglass in separate windows.
- Right-click anywhere on the backglass. This should bring up the B2S options dialog. It should look like this:
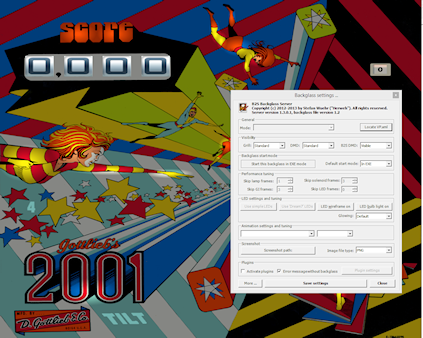
To bring up the B2S options dialog, you have to
run a VP 10 table that has a matching B2S backglass file installed.
Running the table from within Visual Pinball will display the table
and backglass in separate areas on your screen. Right-click the mouse
anywhere in the backglass area to bring up the B2S options dialog.
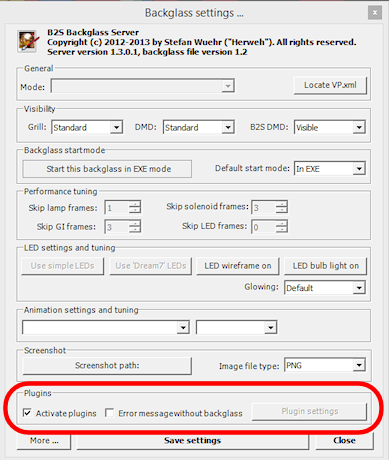
The B2S options dialog. The "Plugins" section at the
bottom is what we're interested in here.
- Check the box next to Activate plugins, and un-check the box next to Error message without backglass.
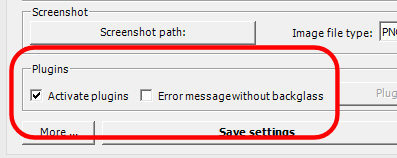
Make sure that Activate plugins is checked,
and Error message without backglass is un-checked
- Click Save Settings
- Exit the table (press "Q" and then "Q" again) and close VP
Check that it's working
Before proceeding, make sure you close all VP windows that you might
have had open from the steps above. You want to make sure VP has a
chance to restart with the new settings.
Now start VP, and load a table that has a B2S backglass. You can use
the same table you used during the setup procedure in the step where
we updated the B2S backglass settings.
As before, when the backglass appears, right-click the mouse anywhere
in the backglass display area to bring up the options dialog. Look
to see if the Plugins button at the bottom is enabled:
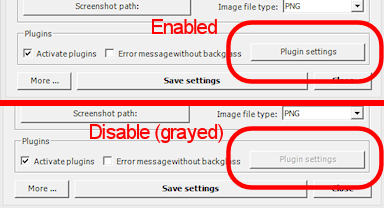
If the button is disabled, DOF isn't getting loaded. Go to the
troubleshooting section below for
things to try.
If the button is enabled, click it. This will bring up a separate
dialog that shows the status of each plugin.
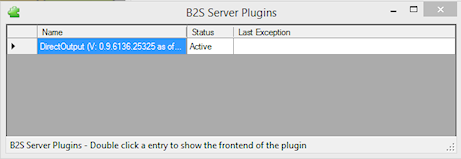
Look for a DirectOutput entry in the list.
If you don't see any such entry, it means the same thing as a disabled
Plugin Status button, namely that DOF isn't being loaded. Go to the
troubleshooting section for help.
Finally, check the Status and Last Exception columns for
the Direct Output entry.
If the Status is Disabled, or there's a message in the Last Exception
box, see the troubleshooting section for help.
If the Status is Active and the Last Exception column is empty,
congratulations! Your DOF setup work was successful! DOF is loading
and starting correctly.
Extra controller setup
If you have any of the following controller types, you have to do some
additional work to tell DOF how to access them:
If you're not using one of the controllers listed above, you can skip
to the next section. Most other controller types don't require
any extra configuration work on your part, because DOF finds them
automatically each time it runs. DOF automatically detects Pinscape,
LedWiz, and Pac-Led.
If you're using one of the controllers that requires extra configuration,
follow these steps:
- In your DirectOutput folder, check for a config folder. If it's not already there, create a new folder and name it config.
- If you're using my DOF R3++ version, there should be an examples folder inside the config folder. Go to that folder and copy the files there to the config folder. If there's no examples folder, download the following files into your config folder (these are the same files included in my DOF R3++ version):
- In your DirectOutput folder, run the program file GlobalConfigEditor.exe by double-clicking it
- On the menu at the top of the window, select File > Load
- Navigate to your DirectOutput > config folder and select GlobalConfig_B2SServer.xml
- Click on the Cabinet Config tab at the top
- Click Select File
- Navigate to your DirectOutput > config folder and select Cabinet.xml
DOF should now load Cabinet.xml every time you start a game in Visual
Pinball. The Cabinet.xml file provided above is just a starting
point, though - you still have to edit it to add information on your
Sainsmart relay board or Teensy light strip controller. See the
sections for those devices for details on what to add to the file.
The DOF config tool
The next (and nearly final) step is to tell DOF how your feedback
devices are connected to your output controller. If you haven't
already started installing your feedback devices, you might want to
skip this section for now and come back to it when you get to that
point.
The basic thing we have to do is tell DOF which type of device
is connected to each port number on your output controller.
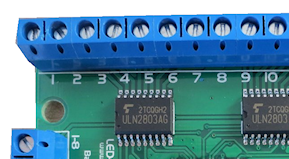
What's a "port number"? Every output controller is a little
different, but they all give you a set of wiring terminals where you
connect your output devices. For example, the LedWiz gives you two
rows of screw terminals that look like this:
You connect one device to each screw terminal. For the details of how
the wiring is actually connected, see Feedback Device Wiring, but
for our purposes here, let's just think of it like this: each device
is connected to one terminal on an output controller.
You'll notice that there's a number printed next to each terminal on
the LedWiz board. Those are the port numbers we mentioned. Every
physical wiring terminal has a port number assigned.
You'll also notice that there's not anything printed on the
LedWiz about "Left Flipper", "Shaker Motor", "RGB Flasher #1", or
anything like that. So which terminal are you supposed to connect the
shaker motor to? The answer is easy: it's up to you, so just pick
one! As far as the LedWiz (or other controller) is concerned, all of
the ports are the same. They're just general-purpose outputs that you
can connect to just about anything. The LedWiz doesn't have to know
anything about what's connected, because its only job is to turn the
port on and off when commanded by the software.
But if the ports are all the same, how is DOF supposed to know which
port is the shaker motor, which port is the left flipper, and so on?
That's where the DOF Config Tool comes in. The Config Tool lets you
set up exactly this connection between port numbers and device types.
Which is why we said earlier that you should have already mapped out
your device wiring before you get into this step. You need to be able
to tell the Config Tool which device you're going to attach to which
port number, so you'll need at least a plan for how your ports are
laid out.
Step 1: Log in
The DOF Config Tool is an online tool that you access from a Web
browser. Here's the link:
If this is your first time here, click "Create Account" in the top
navigation bar to set up a new account. An account is required
because the Config Tool has to store each user's unique cabinet setup
data separately.
Step 2: Select your output controllers
After creating an account, the next step is to click "My Account" on
the navigation bar. This takes you to a page where you can tell the
tool which output devices you have.
Go through the list and tell the tool which devices you have. If you
have only one type of controller, all you have to do is find that type
in the list and set its drop-down to "1". The number simply indicates
how many units you have of each type, so if you have a single
unit, set it to "1".
If you're using a Pinscape controller, set Number of Pinscape
devices to 1 and leave "Number of FRDM-KL25Z Devices" set to 0.
This is a little confusing: Pinscape runs on a KL25Z, so it might seem
like, technically, you do have one of those as well. But the
"FRDM-KL25Z" listing in the Config Tool really should be labeled "old
Pinscape v1 firmware". Assuming you're planning to use the modern
Pinscape firmware, just say that you have one Pinscape unit and zero
KL25Z's.
When finish setting the output controller selections, click "Save
Settings" to save the updates. Note that, throughout the Config Tool,
you always have to click the Save button before leaving the current
page if you want changes to stick. If you navigate away from a page
before saving, any changes made on that page are usually discarded.
Note that your settings in the Config Tool are never set it stone.
You can always come back to this page later to make changes, if you
ever add a new output controller, for example, or change to a
different one.
Step 3: Set up your port assignments
After saving, click "Port Assignments" in the nav bar. This will
take you to the page where set up the mappings between output port
numbers and specific devices. We've finally reached the point
where we're talking about concrete, specific devices!
This page lets you work on one output controller at a time. If you
have more than one controller in your system, you simply set up each
one separately. The "Device" drop-down at the top of the page lets
you select the one you want to work on. As always, remember to save
any changes before selecting a different device.
For now, ignore the boxed items on the right side of the page ("Shaker
Motor - Min Intensity - Max Intensity", etc). These are for
fine-tuning your setup once you have everything working. It's best to
leave the defaults in place initially.
During this step, we're going to set up the "Port number" items
on the left side.
The number of "Port" items shown on the page depends on the type of
output controller you're using. For an LedWiz, for example, there
should be 32 ports, Port 1 through Port 32, because that's how many
physical ports an LedWiz has.
For a Pinscape controller, the page will show 128 ports. You might
not have that many physical ports in your setup, but that's the
maximum that the firmware can handle. Your actual number of ports
depends on how whether or not you're using the expansion boards, and
if so, which ones you're using and how many of each. To keep things
simple, though, the Config Tool ignores all of that and just gives you
the theoretical maximum of 128 slots. You should simply treat any
slots beyond the ones in your actual system as "reserved for future
expansion", in case you add more expansion boards later, for example.
Just leave any extra slots blank on the Config Tool page.
To set up the port mappings, all you need to do is go through the
ports one by one, and select the device type attached to each port
from its drop-down list. If you've already connected your feedback
devices to their output ports, hopefully you kept notes on which
device was wired to which port! Get out those notes now and enter the
same information the Config Tool port list.
If you're not sure what any of the terms in the drop-down list mean,
see DOF Config Tool Device Descriptions. That provides a full list of all of
the devices in the drop-down lists, with detailed explanations of how
they're usually implemented in virtual cabs. The devices in the drop
lists are mostly self-explanatory, but some of them are pretty
obscure, plus there's a certain amount of "virtual pinball jargon"
that probably won't make much sense if you haven't spent a lot of time
in the forums.
Once you enter all of the devices, click Save.
Step 4: Generate your config files
If you're still on the Port Assignments page, you should see a button
near the top called Generate Config. Click it. The Config Tool
will now create your customized configuration files and download
them to your PC as a ZIP file.
Wait for the download to complete. Open the ZIP file. Unzip the
contents into your C:\DirectOutput folder (or wherever you installed
the DOF files back at the start of this process).
Important: Unpack all of the .ini files from the ZIP
file generated by the Config Tool, and don't rename any of them.
Some people get confused by the multiple files and think you're
supposed to choose one of them. You're not. You need all
of them, with the exact names generated. Each file corresponds
to one output controller, and the number in the name (if any)
tells DOF which controller the file goes with. If you don't
unpack all of them, or if you rename any of them, DOF won't
work correctly.
Step 5: Test it
You should now have a fully working DOF setup! You should try running
a DOF testing table to check that the commands can make it all the way
through from Visual Pinball to your devices. See
testing below for instructions.
Update your config any time you change your device setup
Any time you change anything in your cabinet that affects the DOF
setup, you'll have to return to the Config Tool, make appropriate
changes to the settings there, and then re-generate your config
files. The Config Tool remembers your saved settings between sessions
(that's why you have to create a user ID and log in), so you'll only
have to enter any new or changed information for your output
controller list or your port assignments. After you make any needed
changes, repeat the Generate Config step: click the button, download
the ZIP file, and unzip the contents into your Direct Output install
folder. Simply replace the old copies of the config files each time
you do this.
Running a DOF test table
The final and most important test is to see if Visual Pinball can
successfully control your feedback devices during a game. The
easiest way to do this is with a VP table specially designed for
testing DOF.
Here's a good test table you can use:
(If that link doesn't work, try searching the
vpuniverse files section for
"DOF Test Table VPX", or just do a Web search for the same term.)
Once you find a suitable test table, download it, unzip it into your
Visual Pinball > Tables folder. Open it in VP and press F5
to play the game. The test table linked above provides on-screen
instructions with keys to press to try activating different devices.
You can go through your attached devices and verify that they work.
If none of your devices work, your DOF setup probably has a configuration
problem. See the troubleshooting
section below for help.
If some of your devices work and some don't, you can be certain that
DOF itself is working, since a software problem with DOF would prevent
anything from working. Check the wiring to the non-working devices,
and double-check that they're set up correctly in the DOF Config Tool.
For example, double-check that the port number that you entered for
each device in the Config Tool matches the port number printed on the
controller board where the wiring to the device is connected.
How to enable DOF in VP
There are two requirements for a game to work with DOF:
- First, it has to be listed in the DOF Config Tool's database. To see the current list of supported tables, log in to the Config Tool, go to the Table Configs tab, and open the Table Name drop-down list. This has all of the tables that the Config Tool currently supports.
- Second, the table's script in Visual Pinball has to include B2S backglass support.
With VP 10, almost every table automatically uses B2S if it's
installed. There's usually nothing you have to do as a player to
enable DOF for these tables; it should just work when you run the
table.
With VP 9, the situation isn't nearly as DOF-friendly. Most
tables in VP 9 require a small amount of script editing to enable
B2S support, which in turn enables DOF support.
Both DOF and B2S came onto the scene during the years that VP 9 was
the dominant version, so there was a lot of evolution of the common
scripting practices among VP 9 table authors. As a result, there's
not a simple formula for "fixing" VP 9 tables to use B2S and DOF.
Many later VP 9 tables, written around 2016, have native B2S support,
and you won't have to do anything to get it working. Slightly earlier
tables have support for B2S coded in and ready, but disabled by
default; you have to do a little script editing to enable it. And
most earlier tables have no pre-coded support for B2S, but support can
be added with some minimal script editing.
To determine which type of VP 9 table you're working with, start by
downloading the table file (.vpt) and the matching backglass file
(.directb2s). Make sure that both files have the same name, except
for the respective .vpt and .directb2s suffixes. Now:
- Open the table in VP 9
- On the menu, select Edit > Script
- Look for a line like this:
- If you find such a line, simply change the "0" to the number listed for B2S. (Or, if the comments also call out a setting specifically for DOF, use that number instead.) Save and run the table. If it successfully displays the B2S backglass, you're set.
- If you can't find a "cController" line like the one shown above, try searching for a line that looks like this:
- When you find that, replace it with this:
- Save, and try running the game. Again, if it displays the B2S backglass, the table should now work with DOF.
- If you can't find any mention of "VPinMAME.Controller" anywhere, it's probably not a ROM-based game. In this case, the table can be converted to use DOF, but it requires substantial custom scripting work that's beyond the scope of this chapter.
Const cController = 0 ' 1=VPinMAME,
' 2=UVP backglass server,
' 3=B2S backglass server
Set Controller = CreateObject("VPinMAME.Controller")
Set Controller = CreateObject("B2S.Server")
Disabling unwanted sound effects in a VP table
VP tables are mostly written with desktop play in mind, so they
assume that you want digitized sound effects for every mechanical
event in the game: flippers, slingshots, bumpers, replay knockers,
gear motors.
The whole point of using DOF feedback devices is that real mechanical
devices produce more realistic audio and tactile effects than
recordings. But when you play a DOF-enabled table on a DOF-enabled
cabinet, you'll notice that VP often still plays those canned sound
effects, on top of the real mechanical action that DOF is providing.
If you're like most DOF users, you'll probably find that recorded
sound effects sound artificial and redundant when played at the same
time as real mechanical DOF effects. So you'll probably want to turn
off the canned effects that match up with the toys you have installed.
If you have flipper solenoids installed, for example, you'll probably
want to turn off the simulated flipper sounds VP plays via audio.
Fortunately, you can do this. VP 10 makes it easy. At least, it
makes it easy for properly programmed tables.
- Open VP X in "editing" mode (no table needs to be loaded)
- On the menu, select Preferences > Keys, Nudge and DOF
- Look for the DOF Controller Options section on the right side of the dialog
- Go through the listed devices. For each one where you have a
DOF device installed, change the setting from Both to DOF.
- Contactors refers to the bumpers and slingshots
- Knocker is the replay knocker
- Chimes refers to EM-style chimes
- Bell refers to the bell used in some games
- Gear refers to the gear motor
- Shaker refers to the shaker motor
- Flippers refers to the flipper solenoids
- Targets controls sound effects produced when the ball hits stand-up targets; with DOF, these use the bumper devices to simulate an impact effect
- Drop Targets controls sound effects produced when the ball hits drop targets; with DOF, these use the bumper devices
These settings will only work with VP 10 tables that were scripted
properly. Most newer tables should conform, but you might find a few
that don't, which will be noticeable because they won't properly
disable the sound effects according to your settings changes above.
You might be able to fix such a table by following the procedures for
VP 9 tables below. Or you can just contact the table's author and
suggest updating the table to use the modern scripting conventions
that take DOF into account.
In VP 9, the same thing is possible, but unfortunately, it's not
nearly as easy. VP 9 doesn't have option settings for the individual
DOF toys. What you have to do instead is edit the individual table
script for each table you want to fix.
In older tables, you usually have to edit the scripts by painstakingly
scanning through the scripts, finding all of the sound effects
commands, and removing the ones you don't like.
Many later VP 9 tables (written in 2015 and later) include
pre-programmed support for removing individual sounds, but it still
requires you to edit the script to activate it.
Here's the basic procedure for both kinds of tables:
- Open the table in VP 9
- On the menu, select Edit > Script
- Look through the comments at the top for options relating to "Sound Effects", "DOF Sounds", or "Cabinet Sound Options". Some scripts offer variables to set DOF mode (which usually turns off all canned mechanical sounds), and some have several variables to selectively turn off certain mechanical sounds.
- If you don't see any such comments, you can still disable selected
sounds yourself by manually editing the script, but it will take a lot
of work:
- Search for PlaySound. The name in quotes after PlaySound is the sound effect file to play; this usually has a name that suggests its purpose. Each time you find a PlaySound line that has a sound you want to turn off, you can "comment out" the line by putting an apostrophe (') at the very start of the line.
- Search for vpmSolSound. This is another way that scripts play sound effects. For these, don't comment out the line, but instead delete the name inside the quote marks that follow, leaving the quotes intact. For example, replace "vmplSolSound ""Knocker""," with "vmplSolSound """",".
Full documentation links
The official DOF R3 documentation is here:
pinball.weilenmann.net/docu/DirectOutputWIP/index.html
You can also find the documentation on the DOF project page on GitHub:
directoutput.github.io/DirectOutput/. However,
as of this writing, that version has only been updated as far as the older R2 version.
DOF release status
DOF's release status is a little confusing, because its original
author, SwissLizard, suspended work on the project before finishing a
major update that was in progress. He released a few "beta" test
builds of the new "R3" release in late 2015, but he never completed
the official, final R3 release. Fortunately, he published the project
under an open-source license, so other people have been able to
continue work on the project. It's very much alive and well as a
result. The downside is that multiple unofficial versions have
emerged. That creates a little more work for you, since you have
to decide which one to use.
Here are the main options:
- My latest "Grander Unified" DOF R3++ is a merge of all four of the forks of DOF on GitHub as of January 2018, plus some additional updates I've made since then. As of this writing, it has every feature of every alternative version, so you don't have to choose among versions with subsets of features. This is the one I recommend because it has everything all of the other versions offer.
- My original "Grand Unified" DOF R3+ incorporated all of Swiss Lizard's final published code, plus some necessary changes to support Pinscape devices. This also contains my LedWiz enhancements.
- Swiss Lizard's own beta R3 releases are badly out of date at this point, but if you want to find them anyway, try this Web search: site:vpforums.org DOF R3 beta. That should turn up the DOF R3 beta announcement thread on the forums, which contains links to the download files. Look towards the end of the thread for the newest updates.
- The last "official" (non-beta test) release from Swiss Lizard himself was the R2 version. This is even more out of date than the R3 betas, but if for some reason you want something that's nominally official, this is it. Go to vpforums, click on "Getting Started" on the top navigation bar, then select "Frontends and Addons" from the "Essential Files" section of the popup menu. This will take you to a list of files. Find "DirectOutput Framework R2" in the list. Click on the link. This will take you to a download page. (If Swiss Lizard ever officially releases a final R3 build, it should also appear here in due course.)
- Three other developers (as of January 2018) have created their own forked versions of the R3 code on GitHub, to add their own extensions. Check the main DOF page on GitHub to see the current list of forks. All of the forks that were active up through January 2018 were merged into my Grander Unified R3++ mentioned above, and I'm not currently aware of any further work on any of those forks beyond what I merged.
My intention with the Grander Unified R3++ version of January 2018 is
provide a One True DOF, re-unifying all of the forks and eliminating
any confusion about which one to use. The unified version combines
all of the features from all of the forks, so there's no need to pick
a subset of features.
Troubleshooting your DOF setup
When DOF doesn't just work the first time you try to set it up, it can
be a real pain to figure out why. The big problem is that DOF doesn't
have very good error reporting. When something goes wrong, DOF often
gives no indication what the problem might be, leaving you to make
wild guesses until you hit upon the solution.
Taking shots in the dark is an inefficient and time-consuming way to
debug a problem, and it can often make things worse if you try random
changes without thinking things through. So the first thing you
should do is not panic. Don't try random things. Instead, follow the
steps below. DOF does offer a few subtle clues about the nature of
the problem when something goes wrong, if you know where to look.
We'll try to help you read the tea leaves to figure out what's going
wrong and how to fix it.
Step 0: Check your Windows configuration. Make sure that UAC
(User Account Control) is enabled. Some people disable it
because of old/bad advice on the forums. Don't. Turning off UAC
doesn't do what people think; it changes some Windows internals in
subtle ways, and some people have had DOF problems as a result.
Step 1: Make sure you only have one copy of B2S installed. For
whatever reason, a lot of people have run into the bizarre situation
where they have multiple copies of B2S installed on their system.
This can send you down blind alleys for hours. You spend a lot of
time trying to get the B2S configuration files right only to find that
you're changing an old copy that's no longer in use.
So before wasting a lot of time, search your entire hard disk
for the main B2S files and make sure you only have one copy installed.
A good file to look for is B2SBackglassServer.dll.
If you do find extra copies, delete them. Then go to the correct
folder - which should have the one remaining copy - and run
B2SBackglassServerRegisterApp.exe by double-clicking the file.
It's important to run this step because it updates some Windows
Registry settings to point to this copy. If you had an old copy
somewhere else, the Registry settings might have left been pointing to
the (now deleted) old copy.
Step 2: Check the B2S Plugins button. Open the B2S
settings dialog by running a VPX table and right-clicking the
mouse in the backglass area. Check the status of the Plugins
button.
If it's disabled, it means that the DOF .dll files aren't
being loaded at all. In this case, don't even think about what
might be wrong with your DOF config files or anything like that.
You have a very basic problem where DOF isn't even getting into
memory. Here are the main things that can cause this, and how
you might be able to fix them:
- The B2S backglass program doesn't know that you want it to load DOF in the first place. Make sure that the Activate plugins box is checked. If not, check it now, click Save Settings, quit out of the table, exit out of VP, and try checking again with a new VP session.
- B2S can't find the DOF .dll files. Check the DirectOutput shortcut in the Visual Pinball > Tables > Plugins directory. Make sure the shortcut points to the correct folder, the one where you installed the Direct Output .dll files. Make sure that everything is named correctly: the Plugins folder itself, the DirectOutput shortcut file, and the directory link within the shortcut file. The exact names are critical, so put on your proof-reading glasses and check carefully.
- B2S can find the .dll files, but it can't load them. Go back to the Direct Output folder and bring up the Properties window for each .dll file (right click on the file and select Properties from the context menu). Make absolutely sure that you've unblocked every file. Many people who have problems getting DOF to load find that the culprit was blocked .dll files, even though they were certain they unblocked everything the first time through. Double-and triple-check the files, and make sure you look at every single one with a .dll suffix.
- Search your entire hard disk (using the Windows desktop search tools) for extra copies of Direct Output that you might have installed by accident or at different times. Some people have had this experience: they keep checking and re-checking the .dll files to make sure everything's unblocked, and it is. And after the umpteenth time, they realize they've been unblocking a second copy of the files in a whole separate location from the ones that B2S is trying to load.
If none of that helps, you might want to try deleting everything
in your Direct Output folder and downloading a fresh copy of the
files.
Step 3: Check the DOF plugin status. Click the Plugin
Status button above (if it's disabled, go back to step 1).
This should bring up a new dialog showing the status of each
plugin.
Find the entry for DirectOutput in the list. If there
is no DirectOutput entry, it means the same thing as a disabled
Plugin Status button: B2S never managed to load DOF in the
first place. Go back to step 1 above, because this is exactly the
same problem described there with exactly the same possible causes.
If the DirectOutput entry is there, it means that DOF has been
loaded. Now check the rest of the entry. If the Status column
says Active and the Last Exception column is empty,
it means that DOF was successfully loaded and started without
any fatal errors and is running properly, at least as far as
B2S is concerned.
If the status is Disabled, and an error message is displayed in
the Last Exception box, it means that a fatal error occurred
trying to load the DOF program files. Right-click on the Last
Exception box and select Show Exception Details on the menu to
see the full text of the exception. These messages are usually much
too long to fit into the little box. Unfortunately, they're also much
too technical to be of any help unless you're familiar with the inner
workings of DOF's source code. Even so, it's worth taking a look at
the message to see if there's anything in it that suggests to you what
the problem might be. Don't feel bad if it looks like so much
nonsense, though; B2S makes no attempt at all to interpret these
internal system error codes into anything meaningful to humans.
So what do you do with these error codes that were never meant for you
to see? I'm afraid there's not much you can do with them other than
copy them into a forum posting asking for help. There are people on
the forums who know the internals of B2S and DOF who can often help
you track down the problem given these technical details, so you can
try posting to see if someone can help you out. Post the full text of
the exception message, along with details about your directory layout
and anything you've already tried to fix the problem.
Step 4: Check the log file. If B2S says that DOF is loading
properly, but it's not controlling your devices properly, you can
check DOF's log files to see if there are any errors there. If you
tell it to, DOF will write a bunch of status information to a log file
as it runs. This can be helpful when a problem occurs, since the
status information sometimes has details about the specific cause.
First, make sure logging is enabled:
- Open your DirectOutput folder in Windows Explorer
- Run the program file GlobalConfigEditor.exe by double-clicking on it
- On the menu at the top of the window, select File > Load
- In the file open dialog, navigate to your DirectOutput > config folder and select the file GlobalConfig_B2SServer.xml. (If you can't find this file, create one as described below.)
- Click the Logging tab
- Check the box "Enable logging"
- Type .\DirectOutput.log into the Log File box
- On the menu at the type, select File > Save
- Select the same file we started with (GlobalConfig_B2SServer.xml) and confirm
DOF will now create a log file called DirectOutput.log in your
Visual Pinball > Tables folder each time you run a game.
To test this out:
- Start a new VP session
- Load a table that includes DOF effects
- Run the game (press F5)
- As soon as the game finishes loading, you can quit ("Q" then "Q") and close VP
- Open your Visual Pinball > Tables folder
- Look for a file called DirectOutput.log
- Bring up the file's properties and check its Date Modified: it should be moments ago, since it should have been created or updated during the VP session you just finished
- This is an ordinary text file, so you can open it in Notepad to view its contents
Look through the file to see if there are an ERROR or EXCEPTION
messages. If so, read the messages to see if they mean anything to
you. Many of these messages are of a technical nature that are
meaningful only to someone familiar with DOF's program source code,
but some will tell you about straightforward problems like missing
files. If the messages give you any indication what's wrong, try
correcting the indicated problem; if there are error messages that
you don't understand, you can post them to the forums and see if
anyone there can decipher them.
Manually create the DOF global config file
If you downloaded my DOF R3++ version listed in the setup instructions,
it should have included a config folder inside your main
DirectOutput folder, and a subfolder under that called examples.
That should contain a file called GlobalConfig_B2SServer.xml.
You can simply copy this file to the config folder.
If you don't see the config > examples folder or the
GlobalConfig_B2SServer.xml file, you can create them manually:
- Go to your DirectOutput folder in Windows
- Right-click in the background area of the window and select New > Folder from the context menu
- Name the new folder config
- Open the config folder
- Download this file into the config folder: GlobalConfig_B2SServer.xml
